Using a Tablet or Mobile Device to Check In Patients (Check-In Kiosk)
Enable Check-in Kiosk: Where to go?
1. To enable the Check-in Kiosk feature, click on Settings and select the Check-in Portal tab.
Setting Up The Patient Check-in
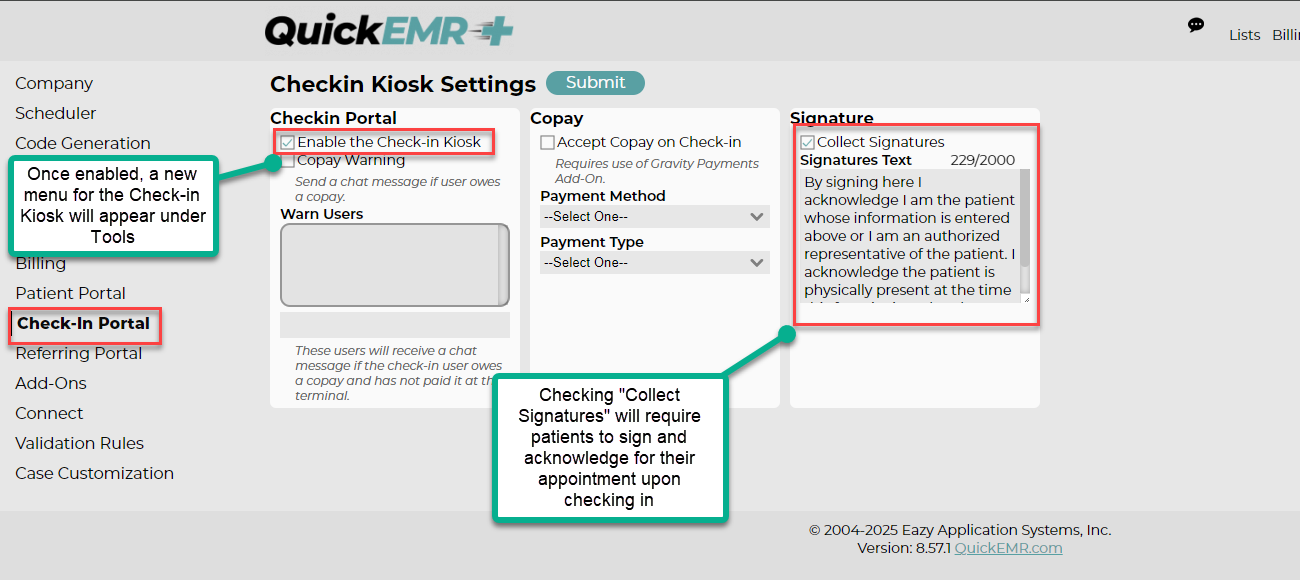
1. Enable the patient check in
1. Enable the patient check in
Check mark will disappear upon saving, the check in portal will need to be re-enabled at the start of every day.
2. Enable "collect signature" will require patient to sign an acknowledgment before checking in
2. Enable "collect signature" will require patient to sign an acknowledgment before checking in
3. If you are using Gravity Payments, you can also opt to allow the patient to pay their CoPay upon check-in.
Accepting a Copay at Check-In
If your practice is utilizing Gravity Payments, the patient can pay their copay upon checking in by use of the Check-In Kiosk.
1. The amount will default to their listed co-pay amount.
2. If they have a saved billing address on file within their case, they can use that to pay the co-pay by simply entering the last 4 digits of their card.
They can choose to leave this blank and choose Manual Entry or your specific card scanner under Device
3. They will then press Submit to finalize the payment.
If Manual Entry is chosen, they will be prompted to enter their card information to pay.
Once completed, the payment will show on the Payments tab within their case, and they will be checked in for their upcoming appointment.
Accessing Patient Check-In: Where to go?
1. Now that the patient check-in is enabled, you will see a new menu item under Tools.
1. Scan the QR code with a facility owned mobile device to activate the check in portal
Check in portal will be remain logged in for 8hrs of inactivity.
2. The user will be prompted to input the designated pin
2. The user will be prompted to input the designated pin
Patient Perspective
1. Patient will fill in the information and the system will automatically designate the associated appointment for the patient as checked in.
Schedule
1. The appointment shown on the schedule will then change to the appropriate color for "Show".
Related Articles
Consent Forms
Creating Consent Forms 1. To create new consent forms within QuickEMR, you will first need to navigate to Tools --> Patient Portal --> Consent Forms. 2. Press the Create button at the top of the screen. 3. Create a Title for your consent form and ...Patient Portal Introduction
To enable the patient portal call 305-394-6197 Opt 3. Purpose Speed up Onboarding Go Paperless Improve documentation trail Set up for future patient interactions Where to go?: Sending a Patient Portal invite to the patient 1. Upon activation of your ...How to Enable and Use the Quickemr Scanning Tool?
*Note that not all scanning devices may be compatible with the Scanner Tool. Please access the following link to test the compatibility of your scanner: https://quickemr.com/setup/twack.msi *Activating this feature will incur a monthly charge. For ...System Notifications
QuickEMR allows you to create system notifications that appear wherever you choose by configuring specific triggers. This feature helps you keep users informed of important details and ensures key information is not overlooked. Where to Go To create ...