Patient Portal Introduction
To enable the patient portal call 305-394-6197 Opt 3.
Purpose
Purpose
- Speed up Onboarding
- Go Paperless
- Improve documentation trail
- Set up for future patient interactions
Where to go?: Sending a Patient Portal invite to the patient
1. Upon activation of your patient portal, a new menu will appear under Actions.
To send a portal invite, a case must be created for a patient with at least the first and last name entered.
Portal Invite for Patients
When you click patient portal within the patient's case, a pop-up will appear, providing three options for sending an invite:
A. Copy and paste the invite URL into a custom email for the patient.
B. Send the credentials directly from QEMR using the email associated with their case.
C. Scan the QR code using a tablet, allowing the patient to fill out demographics in person.
Patient's Perspective
Once the invite is sent to the patient, they will be prompted to create an account.
**Any returning patients who have already created an account will need to click on the associated link
**Any returning patients who have already created an account will need to click on the associated link
After the account is created, the patient will fill out the following information below which includes personal information, contact, medical history, insurance, guarantor, and consent forms (if displayed).

Personal Information
Contact Information
Medical History
Insurance Information
Guarantor
Consent Forms
Review and Save
Progress Tracking for users
Each token dispatched receives a corresponding status. Users can monitor this progress through the patient portal by observing the assortment of status codes provided. To achieve this, navigate to Tools->Patient Portal->Patient Portal and adjust the imported filter to display "All Portal Codes."
*Below is every status displayed within the patient portal and the meaning
| Portal Code Status | Meaning |
Token not Redeemed | The invitation has been dispatched, but the patient has not clicked on it. |
Token Expired | Once two weeks have elapsed, the invitation becomes invalid, necessitating the sending of a fresh one. |
Started | The patient has initiated the process by clicking on the invitation and commencing the information entry. |
Completed | Patient has completed filling the information and is ready to be imported |
Imported | Upon completion, the patient was imported into QuickEMR by the User. |
Importing a patient into QEMR from the portal
Once the patient has successfully completed their patient portal, they will appear in the portal menu.
The user can then initiate the import process by selecting the patient's code.
Import Methods
Users will be able to import the patient's data using 1 of the 3 methods.
A. Create new patient - the system will generate a new patient and case
B. New Case for Patient - A new case will be generated for an existing patient.
C. Update Existing Case - Updating an existing case will overwrite any current data that exist for the chosen case.
Warnings on Import
A. Create new patient - the system will generate a new patient and case
B. New Case for Patient - A new case will be generated for an existing patient.
C. Update Existing Case - Updating an existing case will overwrite any current data that exist for the chosen case.
Warnings on Import
The system will automatically populate data that matches with your EMR, and this information will be displayed in the white text box. In case any fields are absent from the database, they will be marked with an exclamation icon, prompting the user to either manually input existing matching data or generate a new profile using the blue link located beneath the text box.
Possible duplication for contact info for New Case for Patient, Update Existing Case, or Re-imports
When selecting any of the following import methods (New Case for Patient, Update Existing Case, or Re-import), the system will duplicate contact information if it already exists, and it won't overwrite the existing data.
To update the contact information, you must import the new data and manually delete the old information from the case, as the current version does not allow bypassing the import of contact information.
Supporting Portal Users
You can access the roster of accounts linked to the patient portal by navigating to Tools -> Patient Portal -> Portal Users.
Portal Account on the Case Record
Information of a patient's portal account can also be found on their case record on the overview tab.
A reset password link can also be sent to the patient from this page.
A reset password link can also be sent to the patient from this page.
Settings
Diverse settings and configurations are available within the portal settings. If you have reminders activated, you can allow the patients to have the option to subscribe to appointment reminders during intake.
Terms of Service
The terms of service are presented in the patient portal near the conclusion of the intake process. To modify this text, you can access it within the Patient Portal Settings. Users will also have the opportunity to choose to display these forms on the portal from this menu.
Consent Forms
The "display consent form" box will show all active consent forms currently in the system for the patient to sign within the portal.
Creating Consent Forms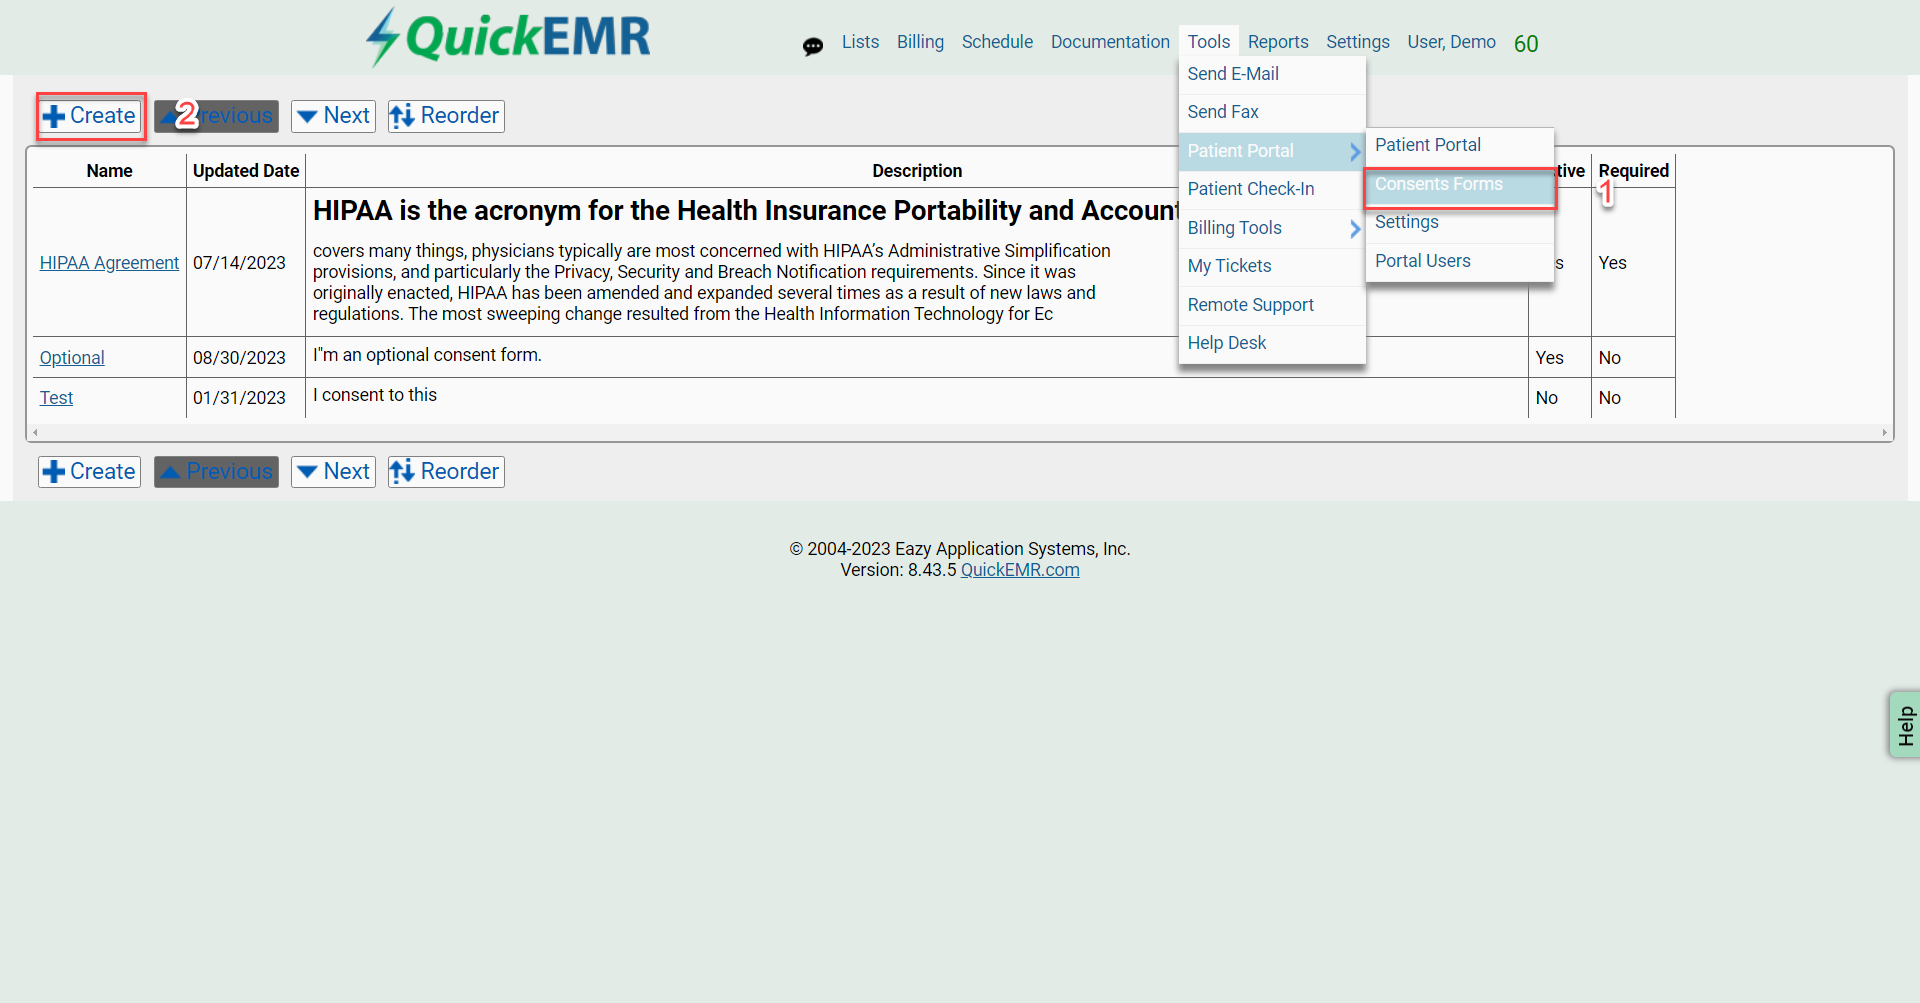
To create consent forms, you can locate this option within Tools -> Patient Portal -> Consent Forms.
Users will be able to customize, edit and activate their own consent forms on this page.
Users will be able to customize, edit and activate their own consent forms on this page.
Creating Consent Forms Continued
The required check box will allow the patient to choose whether this is a form that needs to be signed or can be bypassed.
When creating your consent form, use the appropriate markdowns to style your document.
Where are the consent forms when they are signed by the patient?
All imported forms signed by the patient, can be found in patient's case attachments when imported
Related Articles
Sending a signature request to a patient via email
How to send a signature request to a patient? 1. A patient signature request can be sent under a provider's not and click action on the top Sending a Signature Request 1. Users will be given the option to send an invite to the physician via 3 ...Using a Tablet or Mobile Device to Check In Patients (Check-In Kiosk)
Enable Check-in Kiosk: Where to go? 1. To enable the Check-in Kiosk feature, click on Settings and select the Check-in Portal tab. Setting Up The Patient Check-in 1. Enable the patient check in Check mark will disappear upon saving, the check in ...Consent Forms
Creating Consent Forms 1. To create new consent forms within QuickEMR, you will first need to navigate to Tools --> Patient Portal --> Consent Forms. 2. Press the Create button at the top of the screen. 3. Create a Title for your consent form and ...