QuickEMR - Reminder Calls & Text Messages Setup

QuickEMR - Reminder Calls & Text Messages Setup

Enabling the reminder feature will incur an additional charge, please reach out to Support@quickemr.com for additional info and pricing.


Purpose
  1. Send appointment reminders to your patients
  2. Reduce No show and Cancellation Rates
Permissions


In order to set up the reminder feature, ensure that you are logged into QuickEMR as a user with administrator permissions. At the very least you must have permission to view and edit “Practice Settings” and view and edit “Message Templates”. You should also have permissions to view Reports and View/Edit Facilities. 

Settings: Enable Quickemr Reminders


1. Once you have the correct permissions go to the main menu and visit Settings -> Connect.

2. On the Text/Voice Provider list select “QuickEMR” as your provider. You may want to also check "Confirm Appointment and Cancel Appointment"
This will allow the patient to submit a response when a reminder is sent.
("Automate Reminders" will be covered at a later part in this article)

Step 1: Accessing and Creating a Message Template

1. Now back on the main menu select Schedule -> Reminder Calls -> Message Templates.

2. At the top left of the table select the “Create” button.

Step 2: Creating a Text Reminder Translation 


1. This is our message template page. The name of the message template is what will display when you are choosing what kind of message you are sending.
For example, this will typically say “Appointment Reminders” or “Clinic Closure”.

2. Next look at the translation type. Each message template can contain multiple translations. You have the option of Text or Voice. We will need both for our basic setup so lets start with the text message.

3. Select the preferred language for this translation,.
*The language field on the message template will only map this translation to the preferred language that is listed on a patient's case.
**This will NOT translate any text from English to another language, users will need to type the translated text into the message box.

4. Select the pick list icon  at the top right of the text area to open up some recommended messages.


1. On the left of this modal are fully built templates that are ready to use. You may insert these templates and edit them as necessary. 2. In the middle are the substitution values available for you to build your own template. These values will auto-populate the associated field based on the patient's case and appointment. 3. On the right is your current message text. You can customize this text by free-typing data, then clicking on a substitution value whenever it is needed. This is a text message so we want it short and it’s purpose clear.

4. Click on Insert to submit your text

5. Now select the “save” button to create our first message translation for our Message Template.


Step 3: Creating a Reminder Call (Voice) Translation

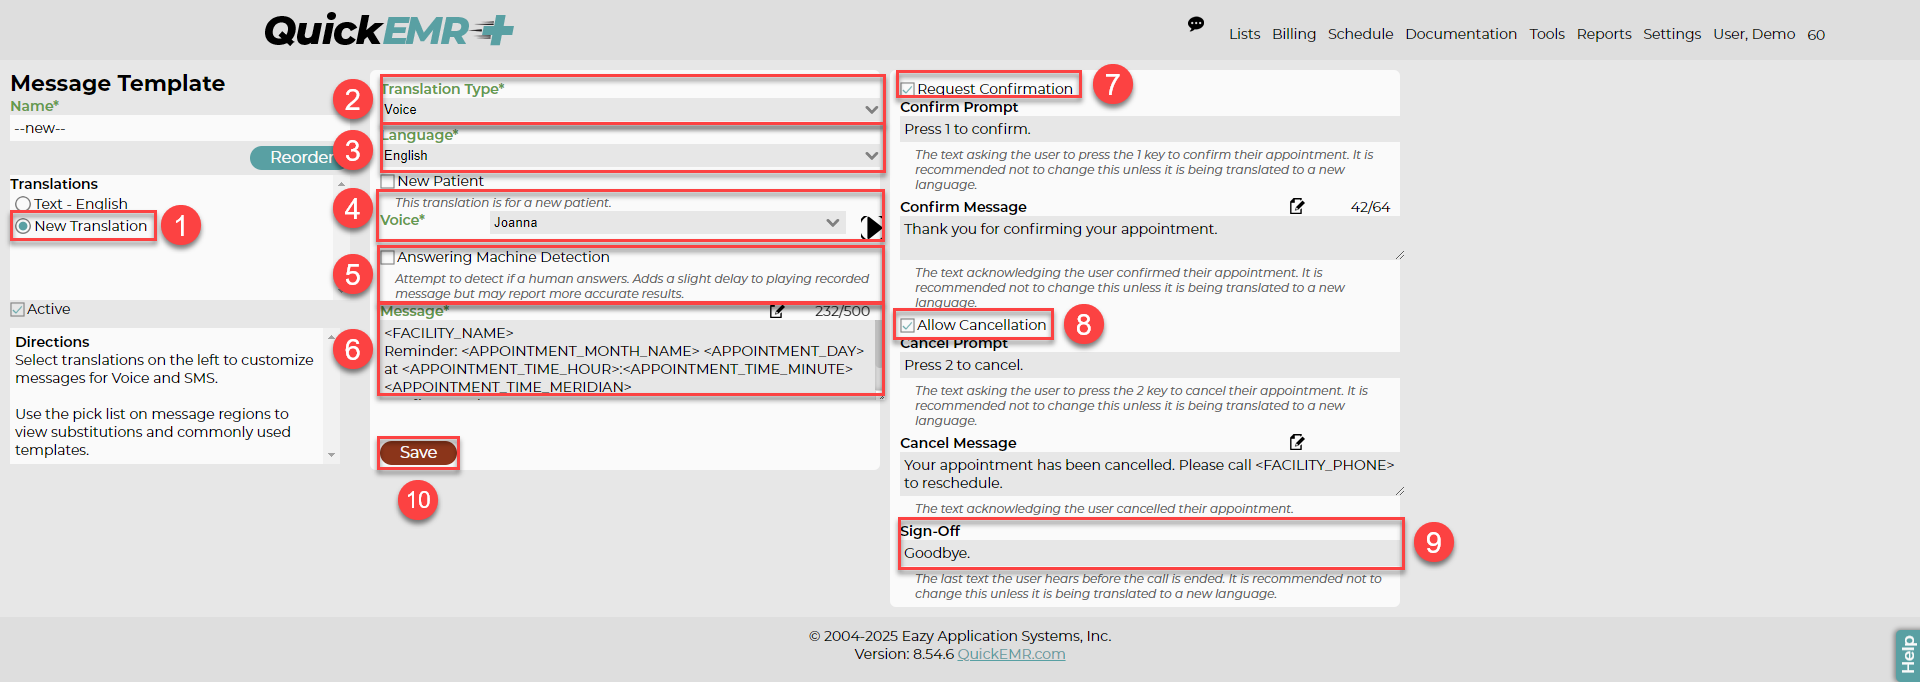
1. Notice on the left that our translations list has a new value reading “text-english”. This is the translation template we just created. You will also need to create a voice translation type for the same message template to support voice reminders. Click the "New Translation” button


2. Click new translation and Select "Voice" For the Translation Type. Several additional fields will be displayed.


3. Select the preferred language for this translation template.
*If available, The language set on the translation will map this translation template to the preferred language that is listed on a patient's chart.
**This will NOT interpret any text from English to another language, users will need to type the interpreted text into the message box.

4. Voice gives us several options for computer generated voices. These voices are different depending on which language you choose and will better interpret the written text associated to the language. Select one of the options and click the play icon to listen to a voice sample.


5. Answering machine detection asks the system to automatically detect if a human or machine answers the phone. While it might be helpful for reporting and ensuring voicemails are left more accurately, it can delay the message for listeners who answer the phone and may cause some confusion.


6. Create the message that will be deliver to the patient for your reminder call template

Voice messages separate the confirmation and cancellation step into a different prompt.

7. Check the “Request Confirmation," this will allow notify the patient to confirm their appointment. Additional fields will display. These fields are best left unaltered unless they are being translated to a different language.


8. Check "Allow Cancellation," this will allow the patient to cancel their appointment. These fields are best left unaltered unless they are being translated to a different language.

9. The "Sign-off" field signals to the listener that the phone call is over.

10. With this new voice option customized select the save button to add it to our list of translations.


Step 4: New Patient Translation

At this point the message template is ready for use in most cases. We have an English translation voice and text option. However, if we want our reminders to share additional information for a patient's first visit. You may do so, by creating a new translation.


1. Select “New Translation” again and choose either Text or Voice for the translation type.


2. Check "New Patient" and adjust your message accordingly.

*You will also need to create both a text and voice translation within the same message template if a new translation is created for New Patients.

If "New Patient" is checked for this reminder translation, this message will only be sent to patient's who have the "New" flag checked on their appointment.

The system defines a new patient based on if the "New" box is checked on the appointment book. This will allow the system to distinguish patient's who are being seen for the first time.
(Please refer to photo on the bottom)

Subscribing a Patient to Calls and Text Reminders


If you used reminder calls previously with one of our partners you should notice the reminder calls subscription is now stored on the phone number and not on the patient record. Patients who were previously subscribed have had their subscriptions carried into this new location.


1. Select the patient tab located on a patient's case.
2. Add or click on an existing phone number
3. A modal will display and users will be able to subscribe the patient to reminders calls or text messages.
Keep in mind that if both call and text are checked, two reminders will be sent as the system will not prioritize one for the other.

4. Select the preferred language, If available this will map the translation that was created for the message template to the patients preferred language.
If a translation was not created in the preferred language, the system will prioritize the main translation of the message template.


When subscribing real patients, FCC requires you have authorization to send automated messages. This may be obtained as part of your onboarding paperwork. While verbal authorization is technically sufficient it may not be defensible. Please review our reminder message terms of service found in this article before using reminder calls in production.

Manually Sending Reminders

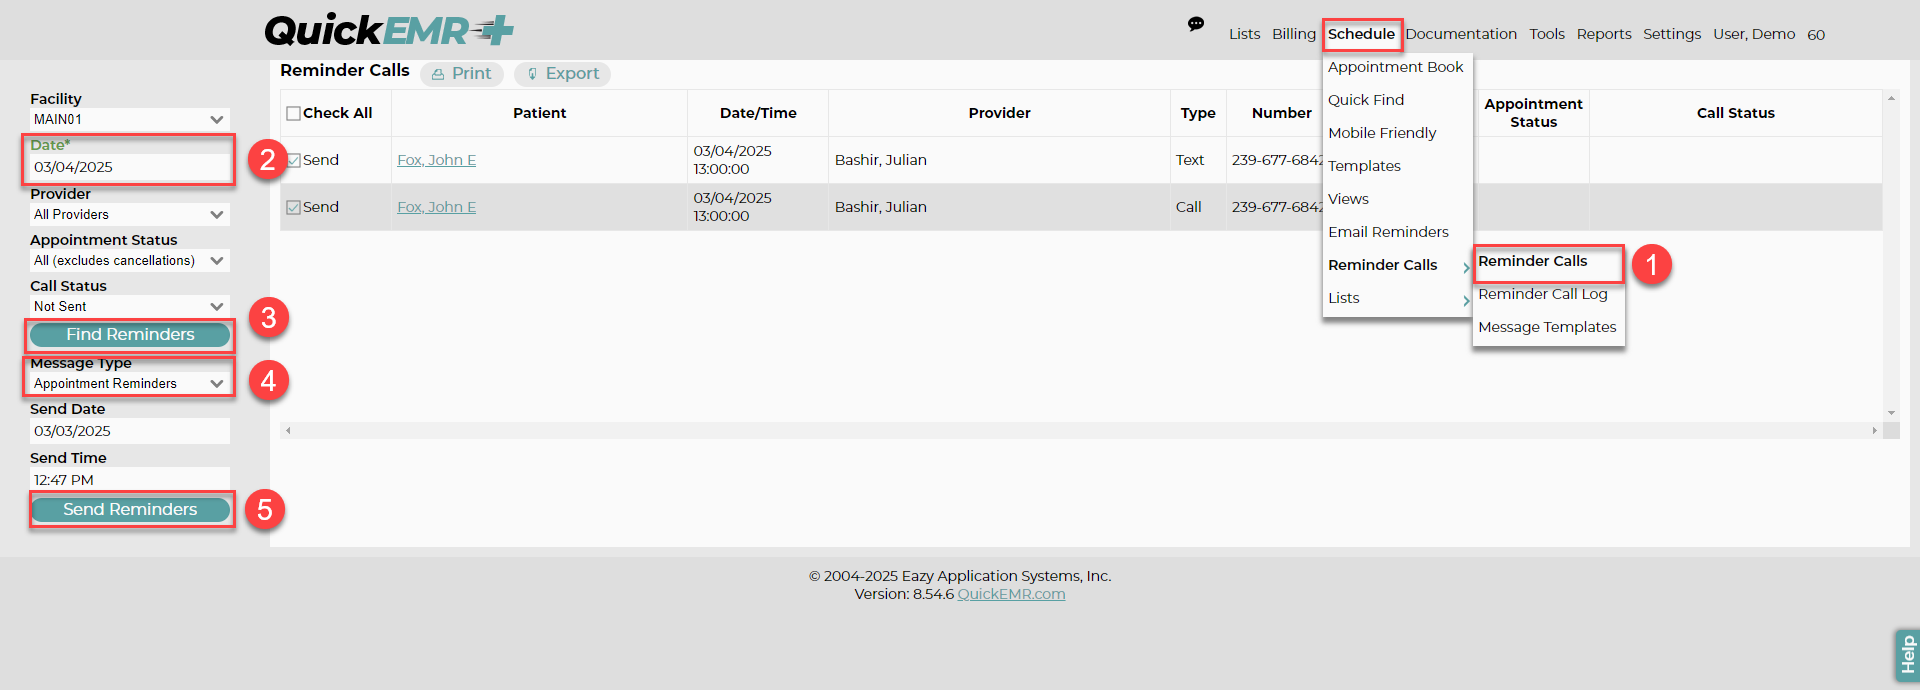
1. If you choose not to automate your reminders, users will be able to manually send out reminder under Schedule->Reminder Calls->Reminder Calls.
2.  Select the appropriate filters, the date range will automatically generate for the next day by default.

3. Click "Find Reminders" and a report will display of patients who have subscribed for reminders and their appointment is scheduled on the given day.
4. You will find the template that you have built under "Message Templates." Select the message type you wish to send.
5. Send Reminders

Automating Reminders (Global Setup)


1. If you choose to opt-in for automated reminders, users will be able to enable automated reminders under Settings->Connect. *This is a global setting and will effect all facilities if more than one facility is listed. 2. Check "Automate Reminders" 3. Once Automate Reminders is checked, a new box will appear and users can set up which message template to send and the reminder times.
4. Click the plus button to add additional reminder entries to schedule

Same-Day Reminders

1. When clicking the plus (+) button, a new form will appear allowing the user to add a new entry.
      Note: For the "Days Before" field, enter 0 to indicate the same day, or enter any number between 1 and 120 to indicate days before the event.

You can also set up appointment reminders to be sent 1 to 4 hours before the scheduled time. These short-term reminders can be used in conjunction with earlier notifications—sent 1 to 2 days in advance—to help ensure patients arrive on time and don’t miss their scheduled appointments.

1. Click the plus (+) icon and select the day of the scheduled appointments.
2. Check the box off for "Same Day".
3. Specify how many hours before the appointment you would like the reminders to send, as well as when the first appointment of the day begins.
4. Select the Appointment Reminder template.
5. Press the Save button.


Automating Reminders by Facility


This setting is for clients that have multiple facilities, but would like to send automated reminders at separate times that differ for each Facility. 1. This can be enabled under List->Facilities->Click on the facility you would like to enable automated reminders. 2. Find and click the Setting tab on left 3. Check "Automate Reminders" and a new box will display. Set your message template and reminder times.


Reminder Call Log

The status for each reminder can be seen under the Reminder Call Log. 1. This is found under Schedule->Reminder Calls->Reminder Call Log.

2. Click on the time stamp link to access the call details for the reminder batch
3. User can see additional information by checking "More Details"

Reminder Text Response

Sometimes, patients may respond to an appointment reminder with something other than the expected "Y" (to confirm) or "N" (to cancel). When this happens, it’s important that both front office staff and therapists are aware of the patient's message. QuickEMR can be configured to automatically forward these non-standard responses as chat messages to the assigned therapist, ensuring everyone stays informed and can follow up as needed.

1. Navigate to Settings --> Connect.
2. Check the box off for "Reply Notifications" and press the Save button.

3. Navigate to Lists --> Users, and select the scheduled therapists.
4. Select the Settings tab on the left side of the screen.
5. Check the box off for Send Chat on Text Appt Reminder and press the Save button.


The text message responses can also be viewed within the Case on the Contact Log tab, as well as in Schedule --> Reminder Calls --> Reminder Call Log


TERMS OF SERVICE

Client Reminder Terms of Service

Patient Reminder Terms of Service


**Coming Soon**

Marketing Subscription Terms of Service

Marketing Calls and Texts Sender Terms of Service


    • Related Articles

    • How to use AI in QuickEMR!

      AI for Transcription and Rephrasing Artificial Intelligence has now come to QuickEMR. We have partnered with OpenAI to bring voice transcription and text rephrasing to the note Details screen. **This feature is both secure and 100% HIPAA compliant.** ...
    • QuickEMR Telehealth

      QuickEMR offers built-in telehealth integration with Zoom and Doxy, enabling your practice to connect with patients directly within the system. This means you can conduct telehealth visits without leaving the software. **Before you begin, you will ...
    • QuickEMR Note Validation

      Note Validation Permission to Complete To allow a user to complete a note, the user must be given permission in the user settings. 1. Navigate to Lists --> Users 2. Select the user, followed by selecting the Settings tab on the left side of the ...
    • SMS Marketing

      QuickEMR allows your practice to send text messages to patients who have provided consent to receive marketing communications. Marketing messages can include general announcements, practice updates, promotional information, or personalized messages ...
    • How to set up credit card payment system within QuickEMR?

      How to get started: The first step to setting up the credit card payment system is to contact Gravity Payments. You will need to create an account with Gravity, who will then send over your account information to QuickEMR so we can properly set up ...