What to update when opening your Quickemr for the first time?
This article is a recommended guide of your initial set up for Quickemr.
Facility Set up
Step 1: Access the facilities menu
1. You will find your main menu at the top right of your Quickemr.
Navigate to Lists->Facilities.
2. You will find a temporary facility already inputted in your database. Click on the code to access the facility information
Navigate to Lists->Facilities.
2. You will find a temporary facility already inputted in your database. Click on the code to access the facility information
Step 2: Facility Information
1. Once you click on the facility code, you will access the facility information (General) screen.
Update the Code and Name of the Facility.
Update the Code and Name of the Facility.
*The code is an internal name that will display throughout your database and is recommended to keep the character limit small, usually an acronym of the name of your facility.
2. While on this screen, fill in any applicable information.
It is also advised to input the facility NPI and Tax ID.
2. While on this screen, fill in any applicable information.
It is also advised to input the facility NPI and Tax ID.
Step 3: Facility Settings
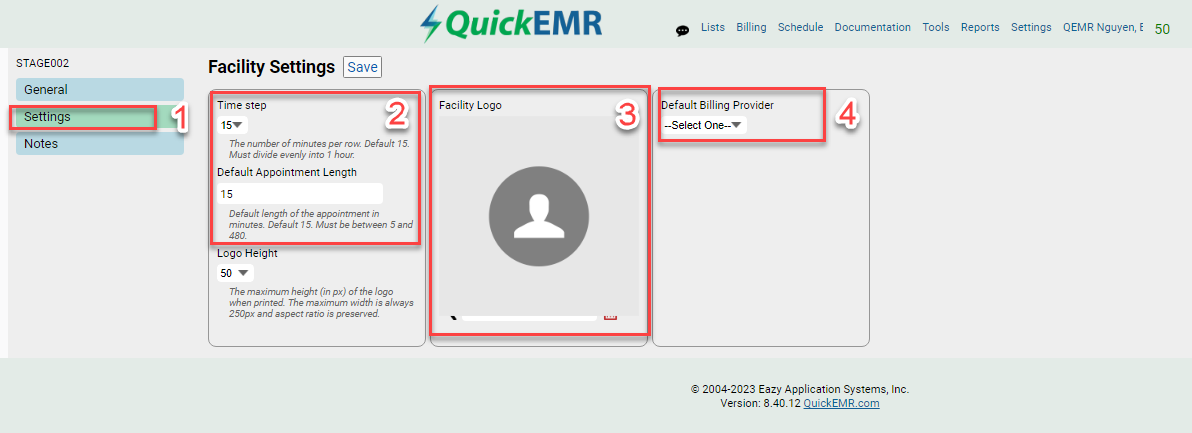
1. Find and click on the Settings tab to the left
2. Time Step-updating the time step will change the time intervals on the appointment book located on the vertical axis
(refer to picture on the right)
(refer to picture on the right)
Default Appointment Length: Will set a default length when a user double left clicks on the appointment book to schedule a appointment
3.Facility Logo: A facility logo can be added to display within your database. The file of the logo must be formatted in either a PNG or JPEG.
4. Default Billing Provider: Users can set a billing provider that will auto populate when a case is created
(needed for those that use EZclaim as their billing house)
For multiple Facility, Click Create and repeat the process as necessary
Fee Schedule Set Up
Step 1: Fee Schedule Groups
Fee schedules are designed to follow an insurance contract. Creating a fee schedule starts with identifying contracts or groups of insurances that pay out at a different rate
A typical setup would include a group for Commercial* (STANDARD), Medicare, and Self Pay. It is also normal for a practice to have only 1 rate for all insurance or multiple commercial and institutional contracts depending on size and scope of the practice.
A typical setup would include a group for Commercial* (STANDARD), Medicare, and Self Pay. It is also normal for a practice to have only 1 rate for all insurance or multiple commercial and institutional contracts depending on size and scope of the practice.
Create a fee schedule group by going under Billing->List->Fee Schedule Group
Step 2: Creating a Fee Schedule
Once the groups are defined it's time to create a schedule.
Visit Billing -> Fee Schedules.
Like the groups you may add a fee schedule with the "+ Create" button, or edit a fee schedule by selecting it's name. A fee schedule will be assigned to a group and given an active date range.
Step 3: Adding Procedure Codes to the Fee Schedule
Now that the fee schedule has been set up. you may add the procedure code to the schedule.
Click create to add a new code or use the search bar to find a procedure code and select it's name.
Step 4: Adding Charges to the procedure codes
1. Click on the Fee Schedule tab on the left
2. Ensure that the procedure code has been added to the fee schedule before adding the charges.
(You will know that the procedure code has been added when it says, "Yes" under the column, "On Fee Schedule.")
3. Once on the fee schedule, add the charges to the procedure code for their associated fee schedule
3. Once on the fee schedule, add the charges to the procedure code for their associated fee schedule
- Charge - This is the amount the practice charges for the given service. This is not necessarily the contract amount. The charge value is used in all exports and billing reports. This field is required to take advantage of most of QuickEMR's billing features.
- Allowed - This is the amount the group is contracted to pay you. This field is used for your reference and is not exported or used in calculations.
- M1-M4 - These modifier codes will be appended to the end of a charge whenever this fee schedule is applicable. Do not use these for capturing Medicare or CCI Edit modifiers such as GP, GO, GN, KX, 59, etc. Those modifiers are added automatically by QuickEMR based on insurance settings. If your insurance contract requires a modifier always be present for a given procedure this may be the correct place to put it. If you separate your RT, LT, 50 charge codes this may be the correct place to put those modifier codes. When in doubt leave these values blank to minimize the risk of billing errors.
Insurance Set Up
Step 1: Access the Insurance Menu
Now that our fee schedule is set up, you may now add your insurances to the database.
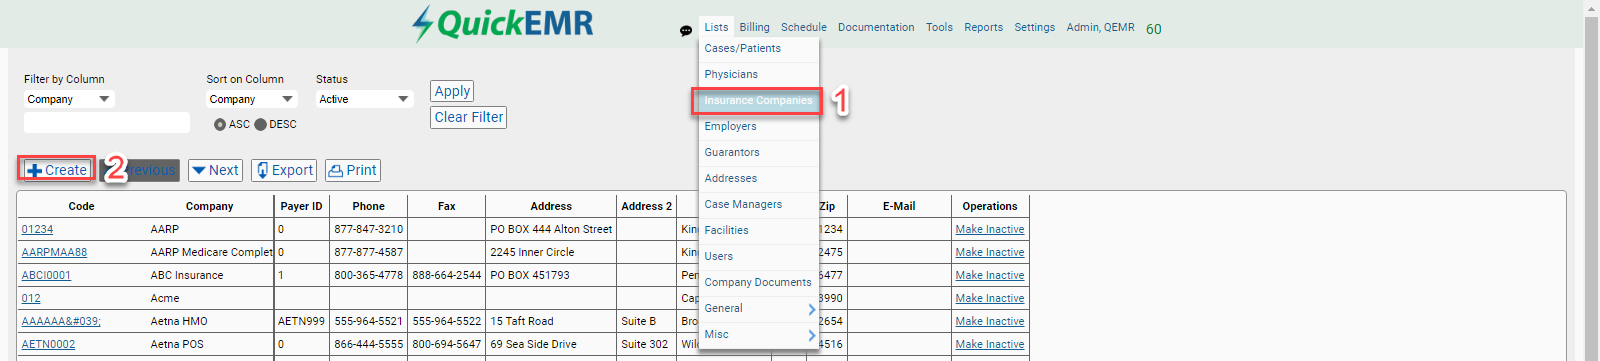
1. This can be done under List->Insurance Companies
2. Click Create to add an insurance
2. Click Create to add an insurance
Step 2: Fee Schedule Group on insurance
When adding the insurance, you will be prompted to enter the fee schedule group.
This will link the charges you have entered from the associated fee schedule to the insurance.
This will link the charges you have entered from the associated fee schedule to the insurance.
While on this page, it is also recommended that you enter the payer ID and address.
The progress note due will also provide warning for the therapist if established.
Please visit Progress Note Due Article for additional information
Step 3: Billing Rules for Insurances
The progress note due will also provide warning for the therapist if established.
Please visit Progress Note Due Article for additional information
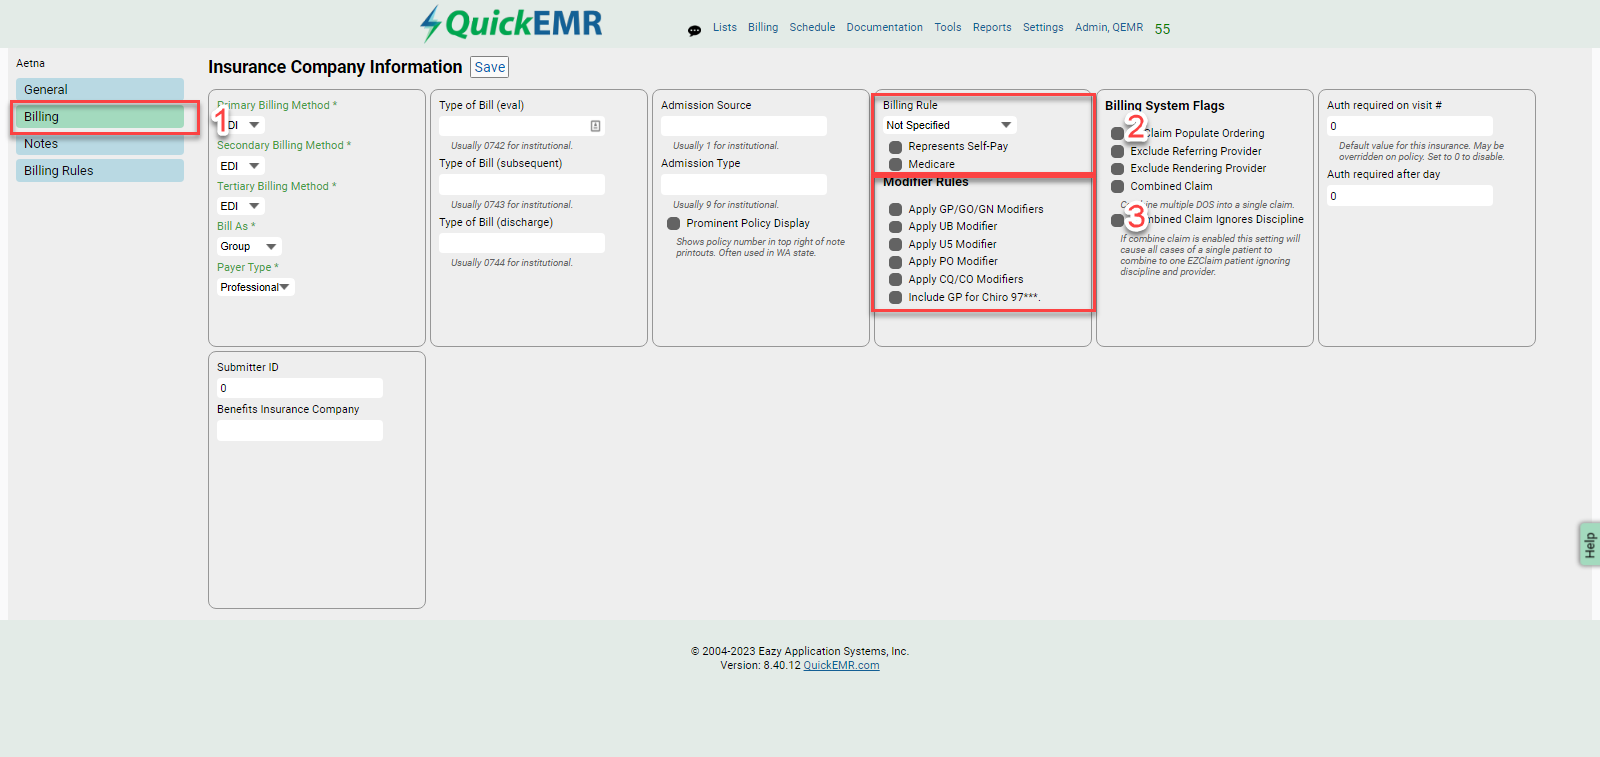
Step 3: Billing Rules for Insurances
1. Upon initially saving the insurance information, a new tab will open up on the left side of the screen.
Navigate to the billing tab.
2. You will find the billing and modifier rules. If necessary, apply the appropriate rules to the insurance.
*If a Medicare insurance is inputted, check the box for Medicare. This will apply the appropriate billing and modifier rules.
**If you accept self pay patients, you will need to create an insurance called self pay and apply the "Represents Self-Pay" field.
**If you accept self pay patients, you will need to create an insurance called self pay and apply the "Represents Self-Pay" field.
Adding New Users: Permission Templates
Step 1: Create a Permission Templates
Before adding a new account, it is recommended to create permission templates for each role in the company.
This will determine what each user is able to access within Quickemr.
This will determine what each user is able to access within Quickemr.
1. Find the Settings Menu->Permission Templates
2. Click Create to add a new template
Step 2: Name the Permission Template
Input a name for the template and ensure that the template box is checked.
Click Save once completed.
Click Save once completed.
Step 3: Assign Permissions
1. Click on the Permission tab on the left
Apply the appropriate permissions based on the role.
Apply the appropriate permissions based on the role.
View - Users may view the corresponding page
Add - Users may have the permission to create/add a new field or profile
Edit - Users may update or make change to the corresponding field
Delete - Users may delete or make a field/data inactive
Print/Export - Users are allowed to print or export a page/report
Delete - Users may delete or make a field/data inactive
Print/Export - Users are allowed to print or export a page/report
2. The super user status will grant the account full access to your system. This should only be applied to trusted users.
Adding New Users: Creating an account
Step 1: Access the User's menu
1. You will find the menu to create a new account under List->Users
2. Click Create to add a new user
Step 2: Account Information
1. Username is a field that is needed for the person to sign into their account
2. Password is a field that is needed for the person to sign into their account
3. Checkmark if the user is a provider
Billing Provider is provider who submits claims and/or receives payment for an individual provider (Checkmark as necessary)
3. Checkmark if the user is a provider
Billing Provider is provider who submits claims and/or receives payment for an individual provider (Checkmark as necessary)
4. Fill in all other required Field(s) and click Save
Step 3: General Information
1. Find and click the general tab on the left
2. If user is a provider, their individual NPI number can be inputted into the corresponding field.
3. Implementing a start date, will not allow the user to sign in until the given date
3. Implementing a start date, will not allow the user to sign in until the given date
4. Input any other information as you deem necessary and click Save
Step 4: Settings
1. Find and click the setting tab on the left
2. If setting up a provider's account, a signature can be added to their account that will auto-populate on notes.
*The file format of the signature must be in JPEG or PNG and cropped accordingly.
Best Method:
1. Write a signature on a blank sheet of paper
2. Scan the signature as a PNG or JPEG into your computer.
3.Crop the photo and upload into QEMR
3. If setting up a provider, apply the following boxes as necessary.
First Visit- Allows the provider to mark their evaluation as complete
First Visit- Allows the provider to mark their evaluation as complete
Complete Notes- Allows the provider to mark any of their notes as complete
4. Apply any additional settings as necessary and click save
Step 5: Permission
The permissions will determine what the user is allowed to access within your QuickEMR
1. Navigate to the permissions tab on the left
1. Navigate to the permissions tab on the left
2. If applicable, Select the related permission template to the user that you created.
3. You may customize the user's permission based on the individual
3. You may customize the user's permission based on the individual
4. Click Save
Schedule Template
Step 1: Create a Template
1. Find the Schedule Menu -> Templates
2. Click Create
2. Click Create
Step 2: Input Template Information
1. Input a nickname for the template, this is an internal name for the template to help distinguish between templates if more than 1 is created.
2. If more than 1 Facility, select the Facility for this Schedule Template. Otherwise it will default to the main facility.
3. Input a start and end date of when this template is to remain active.
(Typically from the beginning to the end of the year)
3. Input a start and end date of when this template is to remain active.
(Typically from the beginning to the end of the year)
4. Click Save
Step 3: Adding information to the template
1. Select the day of the week you would like to edit.
2. Establish the office hours on the bottom right corner (Start and End Time)
If office is closed for that day of the week (input office hours as the same time for both start and end time
(For example Start Time: 08:00 AM / End Time: 08:00 AM)
(For example Start Time: 08:00 AM / End Time: 08:00 AM)
3. Add Provider who would typically work on that day of the week.
4. Apply Blocked times as necessary for each Provider.
(Blocked Reason can be customized under Schedule Menu->List->Blocked Reason)
(Blocked Reason can be customized under Schedule Menu->List->Blocked Reason)
Documentation Settings
1. Find the Settings Menu->Documentation
2. Ability to lock notes after being complete - If checked, the provider will not be able to make any changes to their note after it's been marked complete
(Users who have the appropriate permission or given super user status is able to bypass this setting)
2. Ability to lock notes after being complete - If checked, the provider will not be able to make any changes to their note after it's been marked complete
(Users who have the appropriate permission or given super user status is able to bypass this setting)
3. If default billing rule is set, the billing rule will be applied if one was not give under the insurance setting
4. Set Medicare Cap for the year, this will track the cap for each Medicare case for the given year.
Default Values
Default Values will be automatically applied upon creating a new record for a patient.
Input as necessary.
Input as necessary.
Email Integration
1. Find the Settings Menu ->Email/Fax
2. Add your Email account with the associated email provider
Ensure that SMTP is allowed for your email, please contact your service provider if you do not know where this setting is.
This typically should be a global business email that every user is able to use, but individual emails can be added.
**(Personal emails should not be added)
Ensure that SMTP is allowed for your email, please contact your service provider if you do not know where this setting is.
This typically should be a global business email that every user is able to use, but individual emails can be added.
**(Personal emails should not be added)
Integrating your email simply gives users the ability to send emails directly from QuickEMR.
This includes patient appointments, email reminders, or notes to a physician.
(This does not give Quickemr or any user access to your direct email account)
Please visit our Email Article for additional help
This includes patient appointments, email reminders, or notes to a physician.
(This does not give Quickemr or any user access to your direct email account)
Please visit our Email Article for additional help
Other recommended articles for first time users
Related Articles
MIPS Inside of QuickEMR
MIPS has fully replaced FLR and FLR no longer needs to be completed and may result in claim rejection. Basic knowledge of MIPS? There is no benefit nor penalties to reporting if you are not eligible. However therapists will not be given a raise in ...How does the Chat Feature function?
We just performed an overhaul of the chat client in order to resolve some performance issues on the server. It no longer opens at the bottom of the page. Now you will get a separate tab when you first log in. You will want to leave this tab open at ...Errors sending emails from qemr
Did you change your email password? If you changed your email password, you will need reestablish connection between your email and Quickemr. This can be done under Settings->Email/Fax Gmail Account Users: Updating Password 1. Will need to delete ...How do diagnosis codes populate and carry forward?
Where does the diagnosis list come from? QuickEMR 8 has a central diagnosis code database. This means that unlike past versions of the software, diagnosis codes may not be customized, added, nor deleted. This standardization improves performance, ...What is validated when I mark the note complete?
Starting in version 8.22.12 notes will be validated upon selecting the complete checkbox. This is enabled by default for all clients. If invalid the note will not be marked complete. This is enforced on all notes unless they are of "special type" ...